Flat Iron® Portable 17-inch Gas Griddle
 Flat Iron® Premium Gas Griddle
 Flat Iron® Gas Griddle with Lid


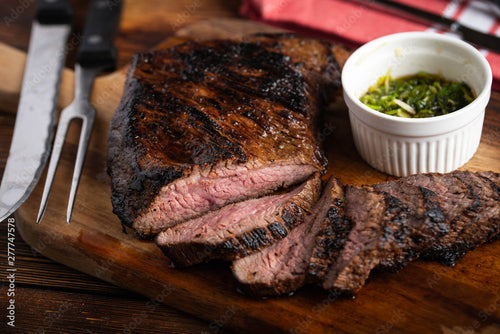
 Reverse Seared Ribeye
 Accessory Spotlight
 Smokey Texan Raspberry Chipotle Stuffed Burger


The turkey is the showpiece of Thanksgiving. Whether you like white meat or dark meat, you know that the preparation and cook is key. We’re sharing our top ten turkey tips to making the best Thanksgiving turkey ever.
1. To Brine or Not to Brine
Some people swear that brining the turkey is the only way to go. Others insist that dry brining is just as good. No matter what your preference, make sure that you start with a totally defrosted bird and don’t forget to add tons of flavorful herbs into your brine. Thyme, rosemary and sage are classics, but don’t forget about lemon and orange peels, bay leaves, apple, tarragon, garlic and even ginger.
If you are using a traditional brine, make sure you have enough space in your fridge for the bag or bucket. Fridge too small? A 5-gallon bucket from your local home improvement store is a great brining tool. Just place it in a large cooler surrounded with ice and place the lid on the bucket for a makeshift brining fridge.
2. Pat it Dry
After the brine, make sure to fully dry out the turkey. You’ll want to place it in the fridge for a full 8 to 12 hours prior to cooking to ensure it is fully dried off and then pay it down with a paper towel to remove any additional liquid as this will help with crisp, brown skin.
3. Butter or Oil for Browning
After the turkey is totally dry, coat it with butter, ghee, or the oil of your choice before cooking. The butter will help brown and crisp the skin even more while it’s cooking.
4. Stuffing on the Side
Potential food-borne illnesses risk aside, turkeys actually cook better when the main cavity isn’t stuffed full of stuffing. Filling it with aromatics like carrots, onions, garlic, and herbs results in a better, and more evenly cooked bird.
5. Cook Turkey on Rack of Veggies
If you don’t have a roasting pan, make sure that you don’t let your turkey cook on the bare rack of the roasting pan. This will mean soggy skin and an unevenly cooked bird. Instead, elevate your turkey by putting it on top of carrots, onions, celery, and herbs in the roasting pan. This will not only allow the heat to circulate around the turkey, it will also mean a more flavorful gravy.
6. Start Cooking Upside Down
Place your turkey on the rack breast side down to start. This will protect the breast meat from overcooking and allows the meat to absorb the juices as they run down into the bottom of the pan.
Wait until the last hour of cooking to flip the bird breast-side up to brown and crisp the skin and help it finish the last bit of cooking.
7. Smoking the Turkey
Using the grill is a great way to cook a flavorful bird and free up oven space. Your bird can be roasted whole or spatchcocked on your grill and we recommend using apple wood or hickory for the best flavor. Just make sure that you have enough fuel to last the duration of the cook. Never cooked turkey on the grill before? Check out this recipe!
8. Keep the Door/Lid Closed
It’s tempting to check on your bird and make sure that everything is cooking away, but resist the urge. Keep the oven door and/or grill lid closed. This will help keep the heat and moisture in ensuring an evenly cooked and moist bird.
The Char-Griller Remote Thermometer is a great way to keep an eye on the temperature without needing to open the grill. It also lets you get inside and out of the cold thanks to it's 100-foot wireless range.
9. 160 is the Magic Temperature
Ditch that little red pop-up temperature gauge and use a real meat thermometer. Insert it into the thickest part of the breast and between the thigh to get the most accurate reading. Pull your bird when it reads 160 degrees and let rest. It will climb those last five degrees while it’s resting and ensure that you don’t overcook your bird.
10. Resting is Key
Resting your turkey is key. It lets all the juices redistribute and ensures that it will be tender and delicious when you carve into it.
What are your secret turkey tips and tricks? Comment with them below!